Perch Lake Lumber CO.#1
Building the Framework
Orginal Design
2010 Standard gauge design ( the old days )
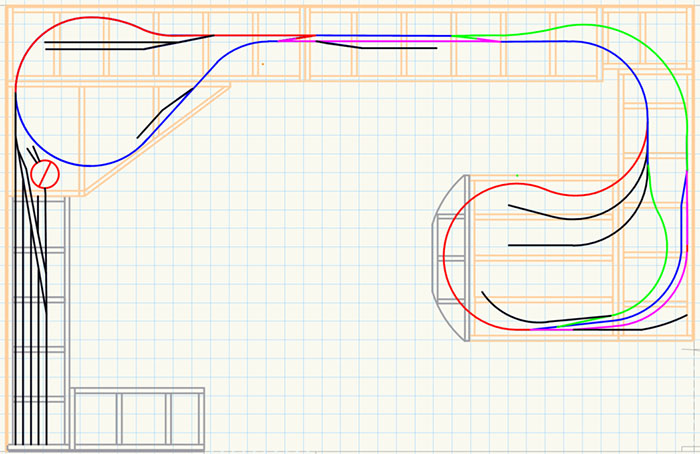
Perch Lake Lumber Company Layout in HOn3 Layout Design, each square =6"
The colors are for block detection Spring 2020
To be able to do this design requires that I build a new layout. Other module activities and club work on modules for the Division convention and the Make It! Camp has kept me busy.
I have been able to build the extension of the layout that includes the planned lumber and mining areas. These are 4.5’ X 5’ with a curved end having a rock wall with a curved trestle.
Construction used available lumber. The furniture grade quality of this lumber allowed me to make the necessary elements for construction.
I relearned the proper way to rip lumber on a radial arm saw. As my wife Sharon will testify, I have come a long way in ripping with this power tool. I have been Inside and outside ripping lumber of 328’ liner feet with the saw which years ago took prodding for me to even think of. I was not comfortable ripping with a tool that I have used for years to crosscut and dado. Just an aside this is the Radial Arm Saw I received from Keith, after the Elmhurst flood on Spring Road, and rebuilt and upgraded into service with Sears Craftsman replacement parts.
I have also added a staging yard to the layout on a shelf over the work bench and Ham Radio equipment. This will allow me to store trains and operate with more than a fancy loop. While Lumber and mining will still be our main operation tourism has brought the need for more provisions into Perch Lake and so we will be having mixed trains serving on our now Common Carrier Line.
I have a small section to build out between the lumber mill and the staging yard but have all the wood to finish this section. I raised the shelves over the work desk to use the lowest shelf for the staging yard. A side benefit is that the lighting mounted on the shelves will not have to move to provide better light for model buildings.
Progress continues 6/18/20 Adding the upper Left corner.
Framework cut for the upper left connection to the shelf
With the wood cut I attached the plywood. The new extension provided a workbench that allowed me to work standing up rather than crawling on the floor. This made gluing and nailing much easier, and I could use the square rather than the lines on the floor.
This is the insert as the glue is drying. It still needs a little sanding, and the point cut off.
Below is the underside showing the bracing.
It is flat and square but the camera in my left hand distorts the shape a bit.
Putting away the tools and reinstalled the shelf above the desk ready for the yard leads that will come after this section.
I added a temporary shelf above the desk to hold items that will go on the new shelves when we find the correct 12" bullnose shelving.
The layout table is ready!
Around the Room
 The final addition connects to the shelf on the left.
Continued in Section 2, Laying out the HOn3 Layout (Click here)
Return to the top (Click here)
Return to Paul's Workshop (Click here)
Join us in the “Greatest Hobby” as a member of the TLMRC.


